Searching for how to draw bow and getting a pile of mismatched results? You’re not alone. Some pages teach you how to sketch a cute ribbon; others show how to pull back a recurve like a pro. Frustrating, right? Here’s the good news: this piece covers both worlds — the artistic side (ribbon bows, gift bows, bowties, drawing realistic archery bows) and the physical side (how to draw a bow in archery safely and cleanly).
You’ll find easy, friendly, step-by-step instructions, little troubleshooting fixes for common mistakes, and suggestions for visuals that make everything click. No snobby art jargon, no dense sports manual — just practical tips that actually help. Ready to draw? Let’s make that bow look (and feel) great.
Which “How to Draw Bow” Do You Mean? (Art or Archery?)
First, a quick question: are you trying to sketch a bow, or trying to learn the motion of drawing a bow in archery? Both are perfectly valid — and both are in this guide. If you want to jump straight to one, use the headers below.
Why cover both? Because they share a common word and a surprising tiny overlap: understanding form helps in the studio and on the range. Also — bonus — if you draw your archery gear, you’ll spot mechanical details you’d otherwise miss.
Part A — How to Draw a Bow (Art / Illustration)
Tools & materials (keep it simple)
-
Pencil: HB for sketching, 2B–4B for shading
-
Eraser: kneaded for subtle corrections
-
Paper: smooth sketch paper or a tablet + stylus if digital
-
Optional: blending stump, ruler, colored pencils or markers
Basic approach — the 4 building blocks
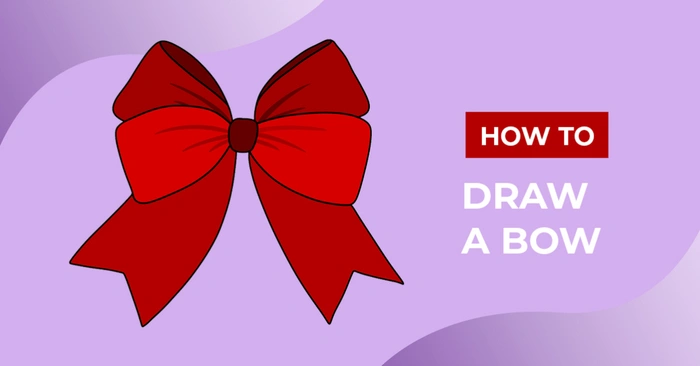
Think of almost every bow as four parts:
-
Center knot — the core anchor.
-
Loops — the rounded parts on either side.
-
Tails — the ribbon ends.
-
Folds & overlaps — where ribbon layers sit and cast shadows.
Start large → refine small. Sketch lightly, fix proportions, then add detail.
Step-by-step (quick ribbon bow):
-
Draw a small oval (center knot).
-
Lightly mark a horizontal guideline for symmetry.
-
Sketch two mirror loops on either side — think fluffy clouds.
-
Add tails under the knot; one may curl.
-
Erase excess guidelines, refine edges.
-
Add inner folds (little crescent shapes) where the ribbon overlaps.
-
Shade: darker where fabric folds meet; lighten where the ribbon catches the light.
Variations — quick recipes
Gift bow (fluffy):
-
Make lots of small loops stacked around the center.
-
Emphasize highlights (glossy ribbons) with tiny white strip on edges.
Hair bow (small, softer):
-
Keep loops compact; more curved inner folds.
-
Add texture lines (grosgrain ribbons have tiny horizontal ridges).
Bowtie (geometric):
-
Use straighter lines and crisp angles. Center knot is rectangular.
-
Symmetry is key — use a light vertical guideline.
Drawing an archery bow (object, not the motion):
-
Start with long, slightly curved limb lines; add riser (handle) in the center.
-
Include string line and arrow rest.
-
Add material details (wood grain, metallic limbs, cams for compound bows).
Shading, texture & making it believable
-
Pick a light source before you shade.
-
Add small shadows where the ribbon folds under itself.
-
For satin ribbon: smooth gradients, bright highlights. For velvet: softer transitions, more subtle highlights.
-
Use a blending stump for soft blends; keep pencil strokes in the same direction as the fabric.
Common drawing mistakes & fixes
-
Asymmetry: redraw a guideline and compare both sides before finalizing.
-
Flat ribbon: add a thin cast shadow where the ribbon overlaps.
-
Overcrowded detail: simplify first — bold shapes, then add detail lightly.
Also Read:
- How Old Was Snow White in the Original Story? Uncovering the Grimm Tale’s True Age
- How Long Does Protein Powder Last? — A Friendly, No-Nonsense Guide to Shelf Life, Safety & Storage
Part B — How to Draw a Bow (Archery Technique)
Safety first: If you’re practicing archery, use proper equipment and supervision. The steps below are general guidance — not personalized coaching. If in doubt, see a certified archery instructor.
Know your bow & set realistic expectations
-
Types: longbow, recurve, compound. Each feels different and has different draw styles.
-
Draw weight and draw length: these matter — too heavy and you’ll strain; too long and gear won’t fit.
Visual suggestion: Diagram with labeled parts (Alt: “archery bow parts labeled: riser, limb, string, nocking point”).
Stance, grip, and the “hook” (the microphone of archery)
-
Stance: feet shoulder-width, perpendicular or slightly open to the target.
-
Grip: relaxed; don’t squeeze the bow handle. Imagine holding a small bird — firm enough to control, gentle enough to let it go.
-
Hook: how your fingers hold the string. Mediterranean (three fingers), split, or thumb — depends on tradition and bow.
Tip: A tense grip is accuracy’s worst enemy. Relaxation wins.
The draw sequence — steady and repeatable
-
Nock the arrow on the string and rest it on the arrow rest.
-
Raise the bow smoothly to eye level, aligning it with the target.
-
Begin the draw using your back muscles, not just your arms — pull straight back.
-
Reach full draw and touch a consistent anchor point (corner of mouth, jawline, or cheek).
-
Aim and release with a smooth, controlled motion.
-
Follow-through: keep your posture till the arrow hits.
Troubleshooting common archery problems
-
Arrow keeps veering right/left: check bow tuning, arrow spine, and your anchor consistency.
-
String slap (string hitting forearm): use an armguard or adjust brace height.
-
Inconsistent shots: film yourself or use a coach to find differences between shots.
Tips & Practice Drills (Both Worlds)
For drawing (art)
-
2-minute warm-up sketches of different bows to loosen up.
-
Value studies: make three small boxes and render the same bow in three tonal ranges (high key, mid, low key).
-
Reference library: collect photos of bows in different materials and lighting.
For archery
-
Dry draws (no arrow): practice the motion, focus on muscle memory.
-
Mirror drills: track alignment and anchor point consistency.
-
Short sessions often: 10–20 minutes daily beats one long session a week.
Friendly Anecdotes & Relatable Moments (Illustrative, not literal)
Picture this: you’re rushing to wrap a birthday present and the ribbon bow looks like it spent the night in a fight with a cat. Been there? (Okay — maybe “you” in the story, not me — but you get it.) That little panic is the same tiny discomfort artists feel when a bow on a character looks “off.” The fix is the same: slow down, look for the big shapes, and make one confident stroke.
Or imagine standing at the range, gripping a bow so tightly that your forearm looks like it might audition for a drum solo. The result? The arrow goes wherever it pleases. Relaxing that grip is like taking the second deep breath you didn’t realize you needed.
These tiny, silly images keep the learning warm and humane — because both drawing and archery are mostly patient habits disguised as high-stakes moments.
Quick Checklist: Did You Follow the Steps?
-
Sketched center knot & loops for ribbon bow
-
Added folds and shaded for depth
-
Tried a dry draw for archery (safely)
-
Filmed one shot or sketch to review posture/composition
-
Kept practice short and regular
Conclusion
Whether you asked how to draw bow because you wanted a pretty ribbon for a birthday card or because you’re starting archery and wanted to learn the draw — you’ve now got a friendly map. Start small: sketch one bow, or make ten dry draws. Look for the simple shapes first. Fix one habit at a time.
Got a sketch or a short clip of your draw? Share it in the comments (or paste a photo link) and I’ll point out one tweak that’ll make the biggest difference. Want a printable step-by-step for the ribbon bow or a 7-day archery warmup plan? Say which and I’ll draft it next.
Happy drawing — and safe shooting! ✏️